by Claudius Woods
The memory leak error, when it occurs on the Windows 10 OS, has a capability to result in a cascade of other errors. Various types of computers frequently encounter different errors, but a memory leak error is a more serious one, and must be fixed as soon as possible . Memory leak is an issue that hinders the performance of every Windows 10 computer, irrespective of it's high quality specs. It often begins as a high memory usage warning which is caused by some running programs. If the high memory usage continues unchecked and solved, the PC eventually slows down.
Contents
Every computer requires a reasonable level of unused memory space in order to function smoothly, and a Windows 10 computer is no different. Every process, program or third party application also requires and uses a specified memory space in to run on your PC. Under normal circumstances, only the necessary amount is used, and if a memory leak occurs, then the amount or level of memory used by a program will go unmanaged, taking up larger than normal memory space than necessary, and the Windows 10 OS will not be able to efficiently allocate and optimize memory usage. This results in a 'Memory Leak'.
In a memory leak, the memory that is left unused will not be released. Memory Leak also happens when a file cannot be opened in the computer's default storage. Even when the running code has already been entered, the file would not still open. These are the effects of the memory leak problem.
As a user, if you observe the manner in which programs are run on your computer (especially via the task manager) you'll notice the memory usage of each program displayed. Now if a certain program is taking up more amounts of memory than the usual, it is important to know why such is happening.
One of the 'symptoms' of memory leak is a g radual, accelerated slowdown in the PC performance. Applications an programs run very slowly with lags in areas such as the taskbar. It eventually results in a system crash if not detected and handled immediately.
The RAM stores up data that is needed for running programs to keep on running, by working around the ones that need to function. For any program at all to efficiently start and run on your Windows 10 PC, access to the RAM memory must not be hindered (RAM means Random Access Memory). Data and information are stored by these apps temporarily on the RAM. The reason for the temporary storage is so that other programs can access the RAM too when needed. If you want to fix the memory leak problem, then go ahead and try out any of the steps listed below.
Whenever a program takes up more memory than usual, that usually indicates a problem . If this persists, then it is due to a memory leak. To fix this, first observe the programs that are running on your Windows PC via Task Manager. End them at once. And open up the task manager by using the Ctrl +Shift + esc buttons simultaneously . Or, go to the task manager by right clicking on the taskbar and clicking it from the available options. Next, look out for those programs absorbing huge memory amounts and force stop them immediately.
Once these programs are closed, end the task manager tab. Ensure that there are no other applications or ongoing programs on your desktop. Then restart your PC. The RAM only stores up data of running apps on the PC, so when the computer goes off, they won't be taking up space anymore. As soon as the computer is turned on again, the RAM will be free and decongested , thus fixing the memory leak issue.
If you're interested in knowing more or getting more details about the reason a memory leak occurs on your PC, the you can enlist the Memory Diagnostic Tool. It helps you scan for bad memory causes and memory leaks on Windows. There is basically no need for installation of any programs whatsoever, in order to run a diagnostic scan on your PC. The memory diagnostic tool efficiently helps you to locate the source of a memory leak problem on your PC. To do this simply follow the outlined steps below.
· Go to Windows search or Cortana.
· On the empty search bar enter the text 'memory diagnostic tool'.
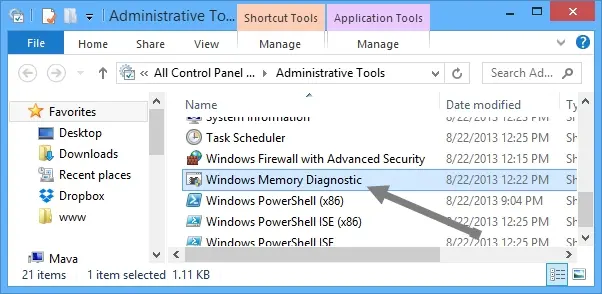
· Next, select the memory diagnostic tool from the options listed.
· To start running the tool, select the option 'restart now and check for problems'.
· ensure that all current work as saved before restarting your PC.
· When the booting process begins, the memory diagnostic tool will begin to function.
· The memory diagnostic tool also performs a scam on the entire memory system to check for errors.
· An advanced scan can be performed as well.
These processes listed above will help you fix the memory leak issue, at least temporarily. But if you're more interested in fixing it permanently then you can go ahead to fix problems that would cause a memory leak issue to resurface. What is required is a maintenance of system service on your PC.
if the drivers on a computer are outdated, that could be a starting point for a whole lot of errors. Aside from memory leaks, outdated results could also bring other system problems with it. Memory leaks resulting from outdated drivers results in much more memory rendered unusable. Therefore, updating drivers on your Windows 10, is another good way to fix memory leak problems, and the steps involved are listed below.
· First, go to the search bar/Cortana and search for 'device manager'.
· open the device manager from the search results and look for drivers that are outdated (Drivers that require updates usually have a yellow exclamation beside them).
· Once these outdated drivers are found, right click on them to update them one by one.
· Select the 'update driver software' option.
· Next, follow instructions that will be displayed in order to finish the updates.
· When the updates have been completed, system drivers will now start functioning with latest versions.
It is necessary to check for malware on your PC anytime you experience unusual errors in system function. A computer virus infection usually results in hindered PC performance . The best solution here would be to find the malware file or software and delete it as soon as possible. You can either use a Windows Defender or an antivirus service to perform a scan and find possible unsafe files on your computer. even if it is the antivirus software that proved to be the problem go ahead and uninstall it. After that go back and see if the memory leak problem has been solved.
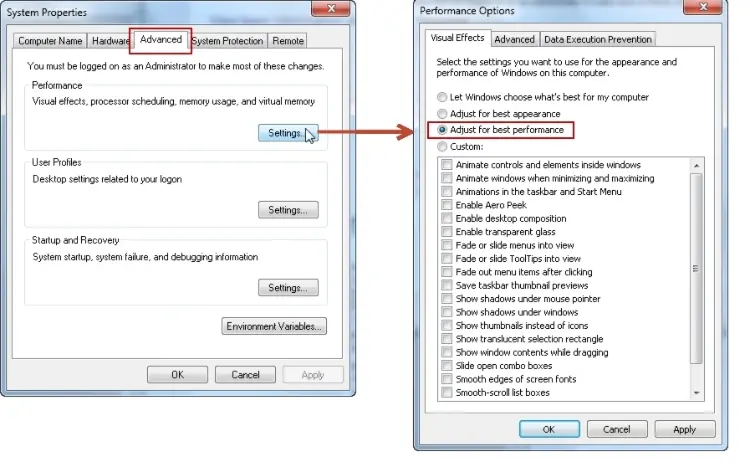
This mainly involves making some adjustments in overall system functioning. This alone could completely solve the problem of memory leaks. Setting up best performance involves adjustment in memory usage and processor scheduling. The Windows Advanced Tool is required in setting up your PC for best performance. The steps are listed below.
· Start the File Explorer application on Windows.
· Right click on the path labelled 'This PC'.
· look for the 'Advanced System Settings' on the left window and select.
· Proceed to the "Advanced" tab.
· Locate the tab 'Settings' and then 'Performance'.
· Next select the option 'Adjust for best performance'.
· Select 'OK' and then close/end the window.
· To make the changes go into effect, ensure that you restart your PC immediately.
When your PC comes back on check your task manager to know if memory leak persists. Else, if you're busy now function smoothly with no features whatsoever, then you can rest assured the memory leak problem has been solved.
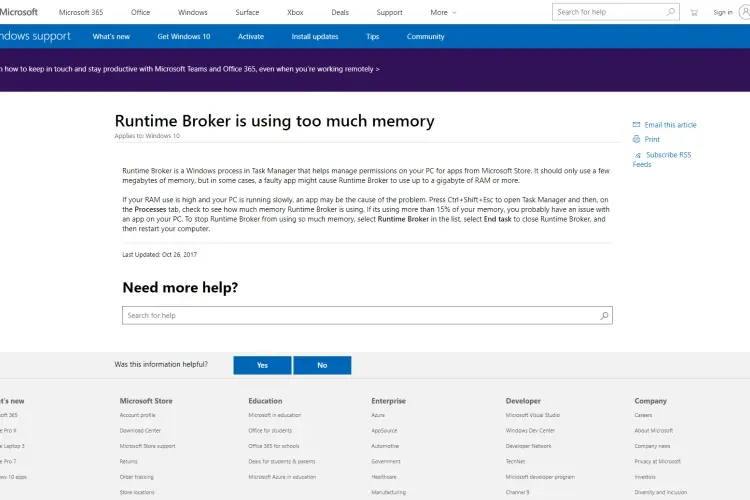
Because services are always running on Windows, a memory leak problem may be normal. When memory leak occurs, programs like the Runtime Broker may take up more memory space than usual. Therefore, the Runtime Broker service will have to be disabled, and that can be done by following these steps:
· Proceed to the task manager.
· Right click on the Runtime Broker process.
· Select the 'disable' option.
If disabling Runtime Broker does not fix it, then disable the other programs which are taking up more memory than usual. as soon as you find time you can disable them using this procedure that has been listed here.
The memory leak problem occurs due to several reasons. This is why numerous methods can be applied to solve it. Every method would require a different procedure. Programs which perform more functions on the computer take up more space than others which do not, and memory is allocated by the computer based on the tasks performed by various programs. The Task Manager helps you know which programs are taking more space than necessary, so if you find any ensure to end the task or find out why this is happening in order to prevent a memory leak.

About Claudius Woods
Claudius began his blogging journey in the early 2000s, sharing his experiences and knowledge about Microsoft Windows on his dedicated website. His ability to simplify complex technical concepts and provide practical solutions to common Windows-related issues quickly gained attention within the tech community.
 |
 |
 |
 |
Receive FREE Stuff Daily here. You can also shoot for Freebies nothing but good stuff.
Once done, try any button below
|
|
|
|